
As a GIS and Database specialist, I like to try different database systems such as SQL Server, PostGIS, as well as Oracle Database. Oracle Database is a powerful, robust database that can be used to store spatial datasets. It is really powerful and rich features. So in this article, we will show you how to install Oracle Database 23ai on Windows Server 2025. Oracle Db can be installed on Windows 11, Windows Server or even Linux (Oracle Linux).
You can visit the link below to see how to install Oracle Database on various system:
Step by Step Install Oracle Database 23ai on Windows Server 2025
Step 1. Install and Configure Java
Prior to the Oracle Db installation, we need to have Java software installed in our Windows Server. You can download Java JDK or JRE from this link. In this example, I have Java JDK version 21 on my Windows Server. Download and install Java using the installer you downloaded from that link. Just make sure you download the Windows x64 version. You can choose either JDK or JRE.
Next, we need to configure the JAVA_HOME environment and PATH. Open the Advanced System Settings and click Environment Variable.

Click Environment variable and then under the System Variable, click New and type JAVA_HOME as the variable name and in the variable value, put the folder where you install the Java JDK.

Still in the System Variable, click Path and create a new entry. Provide the bin directory of the Java.
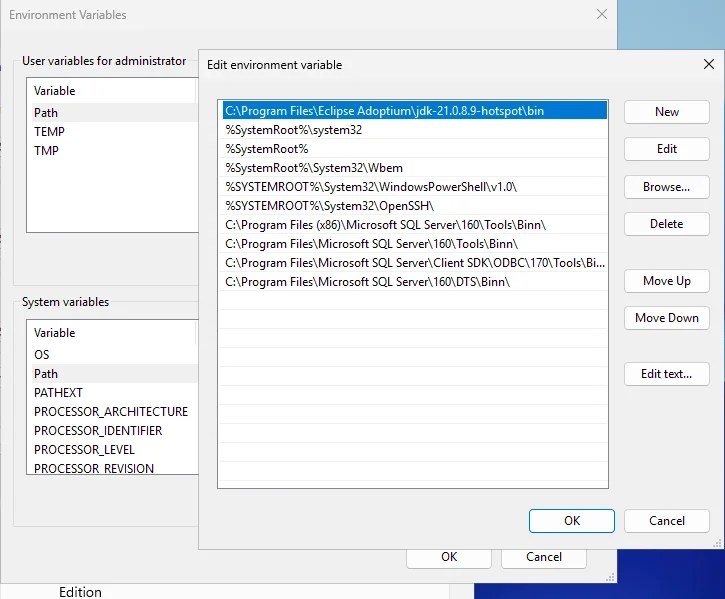
Hit OK and now open Command Prompt and type:
java –version
You should see something like this.
openjdk 21.0.8 2025-07-15 LTS
OpenJDK Runtime Environment Temurin-21.0.8+9 (build 21.0.8+9-LTS)
OpenJDK 64-Bit Server VM Temurin-21.0.8+9 (build 21.0.8+9-LTS, mixed mode, sharing)At this point, we have successfully installed Java JDK on Windows Server 2025.
Step 2. Install Oracle Database 23ai
Login as Administrator in the Windows Server and then we need to download the Oracle Database Free 23ai. Visit this link below to download. Choose the Windows version.
https://www.oracle.com/database/free/get-started/#windows
Extract the Installer
Extract the file WINDOWS.X64_239000_free to a temporary folder.
Run the Installer
Open the extracted folder and then run the installer by double-clicking the Setup.exe file. Follow the installation wizard and I would suggest to leave everything default.


Hit finish and the Oracle Database installation is now completed.
Connect to Oracle AI Database Free
Now let’s try to connect to our database using Command Prompt. Run the following command to connect
sqlplus / as sysdbaIf everything works well, you will see something like this
C:\Users\Administrator>sqlplus / as sysdba

SQL*Plus: Release 23.0.0.0.0 - Production on Sun Oct 26 07:39:45 2025
Version 23.9.0.25.07

Copyright (c) 1982, 2025, Oracle.  All rights reserved.


Connected to:
Oracle Database 23ai Free Release 23.0.0.0.0 - Develop, Learn, and Run for Free
Version 23.9.0.25.07Congratulations, you have successfully installed Oracle Database 23ai on Windows Server 2025.
Step 3. Configure Firewall for Remote Connection
Next we need to allow the Oracle Database for remote connection through the Windows Firewall. Open Windows Firewall and add new rule on the Inbound rule. Also we need to modify the listener.ora.

Now let’s edit the tnsnames.ora file. The file is located: C:\app\Administrator\product\23ai\dbhomeFree\NETWORK\ADMIN\tnsnames.ora. Edit using Notepad.
# tnsnames.ora Network Configuration File: C:\app\Administrator\product\23ai\dbhomeFree\NETWORK\ADMIN\tnsnames.ora
# Generated by Oracle configuration tools.
FREE =
  (DESCRIPTION =
    (ADDRESS = (PROTOCOL = TCP)(HOST = server02.equator.local)(PORT = 1521))
    (CONNECT_DATA =
      (SERVER = DEDICATED)
      (SERVICE_NAME = FREE)
    )
  )

LISTENER_FREE =
(ADDRESS = (PROTOCOL = TCP)(HOST = server02.equator.local)(PORT = 1521))We need to change the host to 0.0.0.0
# tnsnames.ora Network Configuration File: C:\app\Administrator\product\23ai\dbhomeFree\NETWORK\ADMIN\tnsnames.ora
# Generated by Oracle configuration tools.
FREE =
  (DESCRIPTION =
    (ADDRESS = (PROTOCOL = TCP)(HOST = 0.0.0.0)(PORT = 1521))
    (CONNECT_DATA =
      (SERVER = DEDICATED)
      (SERVICE_NAME = FREE)
    )
  )

LISTENER_FREE =
(ADDRESS = (PROTOCOL = TCP)(HOST = 0.0.0.0)(PORT = 1521))Save and close the file. Now using Command Prompt, restart the listener
lsnrctl stop
lsnrctl startMake sure there is no error.

Now our Oracle database is ready for remote connection.
Step 4. Create a New Database User
Now we are going to create a new user for the FreePDB database. Open Command Prompt in the server and then login as SYSDBA.
sqlplus SYS as SYSDBAOutput:
C:\Users\Administrator.EQUATOR>sqlplus SYS as sysdba

SQL*Plus: Release 23.0.0.0.0 - Production on Sun Oct 26 19:45:58 2025
Version 23.9.0.25.07

Copyright (c) 1982, 2025, Oracle.  All rights reserved.

Enter password:

Connected to:
Oracle Database 23ai Free Release 23.0.0.0.0 - Develop, Learn, and Run for Free
Version 23.9.0.25.07

SQL>Now switch the container to FREEPDB1
ALTER SESSION SET CONTAINER = FREEPDB1;CREATE USER equator IDENTIFIED BY "MakeDay.2025";Now grant some permission to the new user
GRANT CONNECT, RESOURCE, DBA TO equator;Done. Now we have a new user that can connect to the database.
Thanks for reading this article, hope you enjoy it and until next time.