If you are looking for a spatial database solution, you may want to consider the Microsoft SQL Server 2019. It is a great database system that works very well with many GIS software. For example, we can couple the SQL Server 2019 with ArcGIS, especially ArcGIS Pro. The ArcGIS Pro is capable to read and write feature classes to the SQL Server 2019 without any issues. In this short article, I will show you how to import a feature class from ArcGIS Pro to Microsoft SQL Server 2019.
Microsoft SQL Server 2019 can store different kind of spatial files. It supports point, polyline as well as polygon. It could be a good alternative to the ESRI file geodatabase. Before we can store our spatial files in the SQL Server, we need to install and configure the server correctly. And then we need to connect the database with the ArcGIS and we can start loading the datasets to the server.
Steps to Import Feature Class from ArcGIS Pro to Microsoft SQL Server
Step 1. Install and Configure Microsoft SQL Server 2019
Skip this step if you already have MS SQL Server 2019 installed in your network. If not, please visit the page below to see how to install SQL Server 2019.
Step 2. Connect ArcGIS Pro to SQL Server 2019
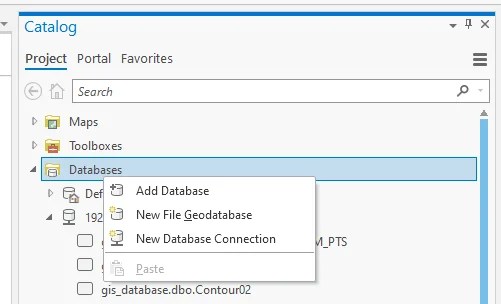
Open ArcGIS Pro and create a new project. And then, from the catalog tab, right-click Database and choose New Database Connection as shown below.

And then, enter the SQL Server credentials

Click OK to complete the step. Now you should see the new database connection in the Catalog. You can also see the database tables from there.
Step 3. Import Feature Class to the Database
In this step, we are going to import our feature class to the database. To do this, right-click the SQL Server database connection and then Import | Feature Class.

Now choose the feature class we want to import. Don’t for get to give a name for the output feature class.

Click the Run button to start the process.
That’s it. Now we have successfully imported the feature class to the SQL Server from ArcGIS Pro. Stay tuned for more ArcGIS Pro tutorials.
