
For some reason, I cannot connect my QGIS to the new Microsoft SQL Server 2019. Until now, I still cannot resolve this issue. But anyway, I will use the previous version of the SQL Server 2017 which works very well with almost all my GIS Software. I am using MapInfo Professional, Global Mapper, QGIS as well as ArGIS software. So in this tutorial, I will show you how I managed to install Microsoft SQL Server 2017 on Ubuntu Server 20.04.
I assume you already have the Ubuntu Server up and running. It is pretty easy to install the Ubuntu Server 20.04 itself. SQL Server can store the spatial dataset accessible from various GIS software. There are two ways to install SQL Server 2017. Using Docker or use the native installation. But, I have some issues when trying to install SQL Server 2017 on Ubuntu Server 20.04.
Steps to Install Microsoft SQL Server 2017 on Ubuntu Server 20.04
There is an official instruction. For more information, please visit this page: https://docs.microsoft.com/en-us/sql/linux/quickstart-install-connect-ubuntu?view=sql-server-linux-2017
Step 1. Connect to Ubuntu Server
Since my server is located in another room, I have to use SSH to connect. I use Termius to SSH to the server.
ssh dhani@192.168.100.60
Step 2. Import Public Repository
wget -qO- https://packages.microsoft.com/keys/microsoft.asc | sudo apt-key add -
Step 3. Add the Repository
sudo add-apt-repository "$(wget -qO- https://packages.microsoft.com/config/ubuntu/18.04/mssql-server-2017.list)"
Step 4. Install SQL Server 2017
sudo apt update
sudo apt install mssql-server
The following packages have unmet dependencies:
mssql-server : Depends: libjemalloc1 but it is not installable
Depends: libssl1.0.0 but it is not installable
There are some unmet dependencies here. So I cannot install SQL Server 2017 on Ubuntu 20.04 with this instruction.
How to Fix
Install libjemalloc1 on Ubuntu 20.04
After doing some research, I found that this libjemalloc1 is available from the Percona repository. So, to install libjemalloc1 on Ubuntu 20.04, use these commands:
Install gnupg2
sudo apt-get install gnupg2
Download the repofile
wget https://repo.percona.com/apt/percona-release_latest.$(lsb_release -sc)_all.deb
Install Repository
sudo dpkg -i percona-release_latest.$(lsb_release -sc)_all.deb
Enable Repository
sudo percona-release setup ps80
Next, we still need to install one more package: libssl1.0.0. First download the package with this command:
wget http://archive.ubuntu.com/ubuntu/pool/main/o/openssl1.0/libssl1.0.0_1.0.2n-1ubuntu5.3_amd64.deb
Note:
If the command above does not work, then use this new update:
wget http://archive.ubuntu.com/ubuntu/pool/main/o/openssl1.0/libssl1.0.0_1.0.2n-1ubuntu5.7_amd64.deb
Now install it
sudo dpkg -i libssl1.0.0_1.0.2n-1ubuntu5.3_amd64.deb
Now let’s try again to install SQL Server
sudo apt update
sudo apt install mssql-server
Output:
dhani@gis-server:~$ sudo apt install mssql-server
[sudo] password for dhani:
Reading package lists… Done
Building dependency tree
Reading state information… Done
The following additional packages will be installed:
gdb gdbserver libbabeltrace1 libc++1 libc++1-10 libc++abi1-10 libc6-dbg libcc1-0 libdw1 libjemalloc1
libpython2-stdlib libpython2.7-minimal libpython2.7-stdlib libsasl2-modules-gssapi-mit libsss-nss-idmap0
python-is-python2 python2 python2-minimal python2.7 python2.7-minimal
Suggested packages:
gdb-doc clang python2-doc python-tk python2.7-doc binutils binfmt-support
The following NEW packages will be installed:
gdb gdbserver libbabeltrace1 libc++1 libc++1-10 libc++abi1-10 libc6-dbg libcc1-0 libdw1 libjemalloc1
libpython2-stdlib libpython2.7-minimal libpython2.7-stdlib libsasl2-modules-gssapi-mit libsss-nss-idmap0
mssql-server python-is-python2 python2 python2-minimal python2.7 python2.7-minimal
0 upgraded, 21 newly installed, 0 to remove and 0 not upgraded.
Need to get 210 MB of archives.
After this operation, 1,094 MB of additional disk space will be used.
Do you want to continue? [Y/n]
Now after the installation completes, run this command to configure SQL Server
sudo /opt/mssql/bin/mssql-conf setup
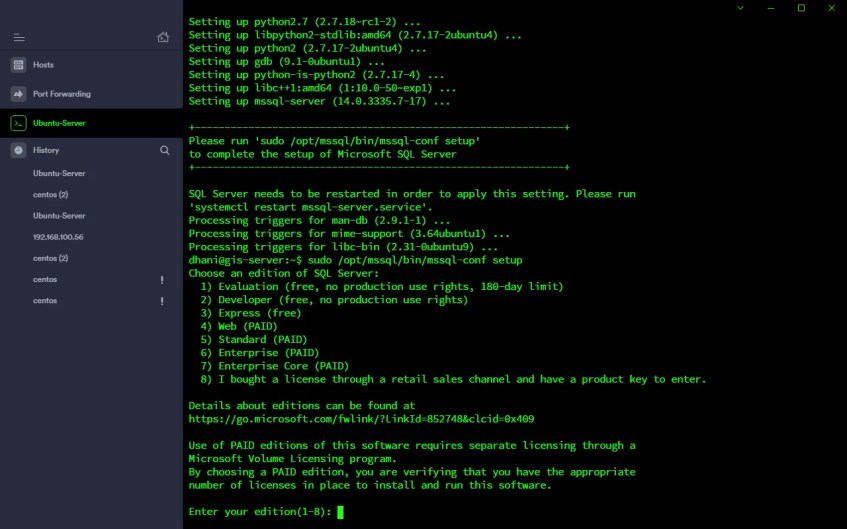
Choose the SQL Server version you wish to install
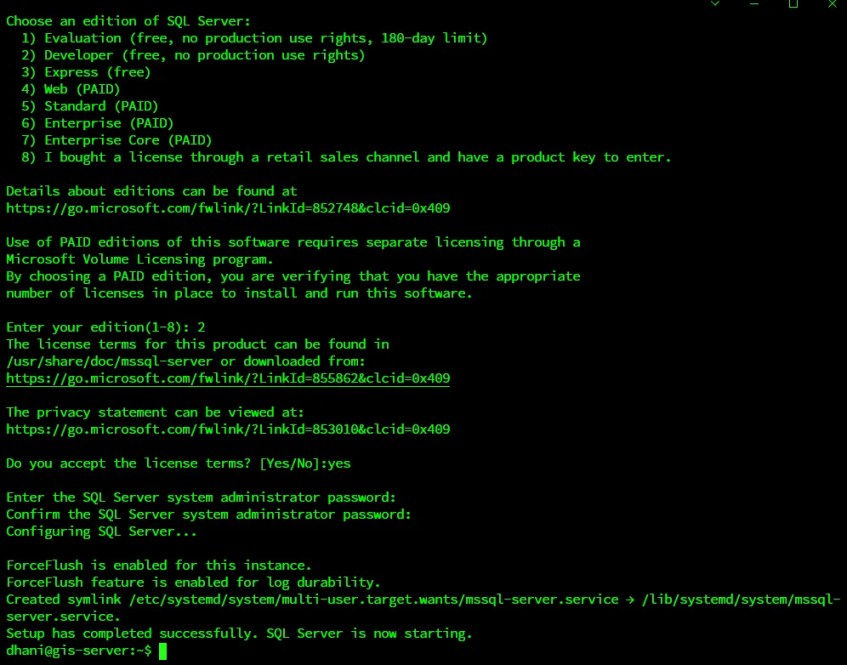
Done. Finally, I can install Microsoft SQL Server 2017 on Ubuntu Server 20.04.
Optionally, we can install mssql-tools that is important for us to connect and manage the SQL Server from the Terminal. We can install this tool using this command:
curl https://packages.microsoft.com/config/ubuntu/19.10/prod.list | sudo tee /etc/apt/sources.list.d/msprod.list
sudo apt update
sudo apt install mssql-tools


Now we need to add the mssql-tools to Ubuntu PATH
echo 'export PATH="$PATH:/opt/mssql-tools/bin"' >> ~/.bash_profile
echo 'export PATH="$PATH:/opt/mssql-tools/bin"' >> ~/.bashrc
source ~/.bashrc
Connect to SQL Server and Create a New Database
Use this command to connect to the SQL Server
sqlcmd -S localhost -U sa -P 'YourStongP@assword'
Now Create a new Database
CREATE DATABASE gis
GO
Done. Now we have a new database called “gis”. Now we can connect our GIS software to this new SQL Server.
Man, you are on top of your game! I have been trying to get this to work for a while. Thanks!
[…] Install Microsoft SQL Server 2019 on Ubuntu 20.04 […]
My man, thanks a lot, you saved my life
I just wanted to add a note, the libssl1.0.0_1.0.2n-1ubuntu5.3_amd64.deb is currently on the version libssl1.0.0_1.0.2n-1ubuntu5.4_amd64.deb , so you might want to update the 2 steps where you mention it
Cheers mate, you are awesome
Thanks a lot.
Just to add with Jonathan he libssl1.0.0_1.0.2n-1ubuntu5.3_amd64.deb is currently on the version libssl1.0.0_1.0.2n-1ubuntu5.6_amd64.deb. If you can please put a note there ‘user should check the current version’ or something similar, people will be more benefited.
Cheers
Just to add to Asad, the current version now is libssl1.0.0_1.0.2n-1ubuntu5.7_amd64.deb
So the command to use is :
wget http://archive.ubuntu.com/ubuntu/pool/main/o/openssl1.0/libssl1.0.0_1.0.2n-1ubuntu5.7_amd64.deb
Since all previous requests regarding updating or leaving a note to check latest version has fallen on your deaf ears [ Smart brain, but deaf ears, ha! So sad! 🙁 ], i’ll not bother asking you to do the same.
Thank’s a lot man. Everythink worked for me!
To add on Jonathan, Asad, Ashutosh:
Current version is
wget http://archive.ubuntu.com/ubuntu/pool/main/o/openssl/libssl1.1_1.1.0g-2ubuntu4_amd64.deb
to install it:
sudo dpkg -i libssl1.1_1.1.0g-2ubuntu4_amd64.deb
not current, more like… this worked for me.