PostGIS is a free and open-source database solution to store your GIS datasets. It utilize the power of PostgreSQL database server. Actually, the PostGIS is a spatial plugin for PostgreSQL that enables us to save or store spatial datasets in the database. We can then connect and open the spatial data from various GIS software such as QGIS, MapInfo or ArcGIS Pro. In this article, we will install PostGIS on Windows 10. We will install the latest version of PostgreSQL 13 and then install PostGIS on top of it.
Steps to install PostGIS on Windows 10
Step 1. Download PostgreSQL 13 for Windows
Navigate to the link below to download PostgreSQL 13 binary installer.
https://www.enterprisedb.com/downloads/postgres-postgresql-downloads
Select the Windows version from the list and the download process will start automatically.
Step 2. Install PostgreSQL Database on Windows 10
Now you have the installer and we are ready to install the PostgreSQL server. Double-click the file postgresql-13.xxx.exe. Below are the steps of the PostgreSQL 13 installation.
The installation process will take sometimes. Be patient and make sure there is no errors. At the end of the installation, you will be asked to run Stack Builder. I would recommend you to run this program so we can install PostGIS.
Installing PostGIS using Stack Builder

Select the PostgreSQL Server from the list and click Next.
Select PostGIS from the list under the Spatial Extensions. Also, you may need to install psqlODBC as well.

Specify the download directory. The Stack Builder will download some files from the internet to the download directory.

Choose PostGIS as well as Create spatial database to create a new spatial database. Click Next


During the process, you will be asked to enable some features. Please select it as you need. I would recommend to enable them if this is your first time installing PostGIS.

Press Finish to complete the installation. Now we need to change some settings on the PostgreSQL Server so it is accessible from the network.
Make PostgreSQL Accessible for the Network Users
In order to be able to connect to the PostgreSQL server from the network, we need to make sure that our settings is correct. The file to check are pg_hba.conf file as well as postgresql.conf.
postgresql.conf
In Windows 10, the default location for the file postgresql.conf file is inside C:\Program Files\PostgreSQL\13\data folder. Open it using notepad. And then find the following line
listen_addresses = '*'
Make sure that line is not commented. In most cases, we do not need to change anything here.
pg_hba.conf
The pg_hba.conf file is located inside C:\Program Files\PostgreSQL\13\data folder. Using notepad again, to open this config file. At the end of this file, add the following line
host all all 192.168.100.1/24 md5
Change the IP address with your network IP address.

Now restart PostgreSQL Server from the System Service window as follow. Right-click the postgresql-x64-13 and choose restart.

Configure Firewall
The next step is to configure the Windows firewall to allow incoming connection through port 5432 (PostgreSQL default port. You may need to adjust the settings if you use different port).
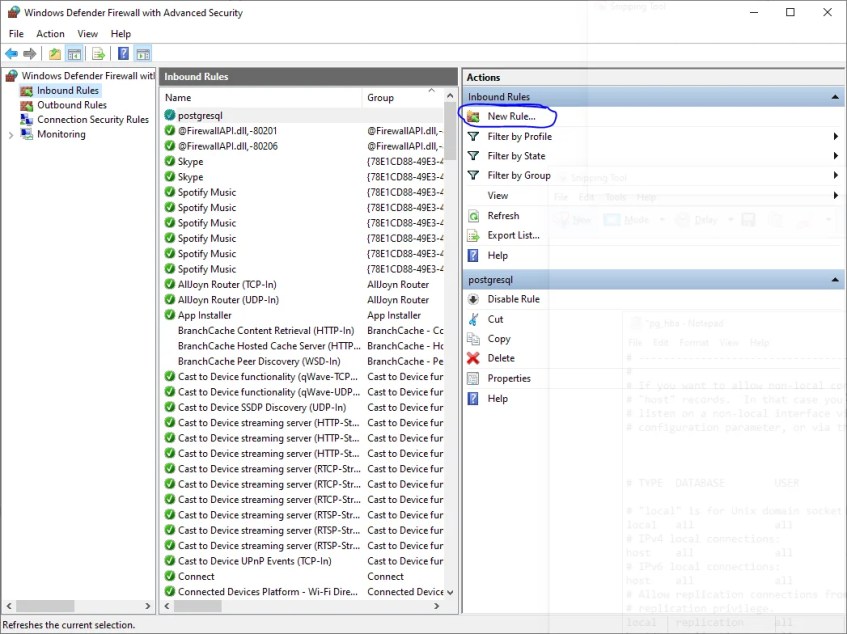
Open Windows Defender Firewall with Advanced Security and then click Inbound Rules. Click New Rule to create a new firewall rule

Select port from the list as follow and then click Next.

Select TCP and then type the PostgreSQL port. In this case, I use the default port for PostgreSQL which is 5432

Click Next and choose Allow Connection

Select the network profile you want to apply this new rule.

Finally, give a new name for the rule and click Finish.

Done. Now you should be able to connect to the PostgreSQL server from your network.


thank you so much
THANK YOU SO MUCH
VERY HELPFUL